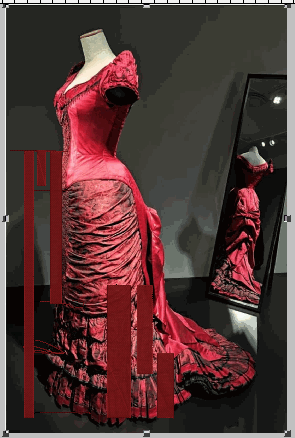
This is how I start the sewing plan for a new replica gown. With proportional measurements. I put this photo, of a favorite red dress from Age of Innocence, into my embroidery software- to use the measuring tools. I make the figure about my height to the shoulder.
Then I place blocks of embroidery in the software that are the height of the different elements of the dress. Here, the skirt. These measurements will help me plan how to cut each part with the least amount of fabric while scaling the design to my height. I am very pleased with how much this help me achieve the finished look.
Some of these measurements include overlap. Tricky will be that my panels of red brocade are only 18″ tall. I will be cheating the overlap a bit but I will be able to use the fabric- thank goodness!!
The six bars are: (left to right)
waist to floor 42″
waist to bottom of bodice 5″
waist to bottom of upper skirt 24″
bottom of upper skirt to floor 20″
ruffle at knee level width 20″
bottom ruffle width 10″
red ribbon on ruffle width 1.6″
black ribbon on ruffle width 0.36″
tiny black edge on red ruffle 0.16″

From this info- The skirt pieces to start can be:
Top of skirt:
lining 24″+ long, darted with some pleats in the back. WHere can I put a pocket?
Overlay seems to have 12 rows of gathering down the center at about 6″ width. I’ll double check those numbers but will use stacked panels of my 18″ wide frabric for this. Need a sturdy lining to keep everything there smooth.
My plan is to make the lining, then make the gathers for the front of skirt and attach the two pieces- then dart and drape to the side back of the dress. Interestingly the bodice and skirt don’t share much fabric. Getting the beadwork done for the bodice is a problem for future me.